Tuesday, October 26, 2010

Food: Shrimp Enchiladas with Parsnips and Sweet Potato

Are you ready? Ever thought of combining shrimp with parsnips and sweet potatoes? Me either. Until this came along - the best recipe I've stumbled upon in the past couple of months. And to make it even better, meat lovers love it too (trust me, two meat-and-potato types just enjoyed this with me a few evenings ago). The dish is so tasty and comforting, I'm considering adding it to my Christmas party menu. Spicy, sweet, fulfilling, warm...Southwest flavors combined with sweet and nutty root veggies. What else could you ask for in the perfect Fall meal? My mouth is still salivating. Seriously. My tummy is full but my taste buds are asking for more.

If you're looking for a pairing, this dish actually goes great with an earthy Malbec but would also be nice with a light, balanced white. And it'd be great even without the shrimp if you're looking for a meal to satisfy vegetarians.
I was even tempted to use the filling as a mashed potato substitute...so feel free to freeze any leftover filling to use as a quick side for a future meal.


Shrimp Enchiladas with Roasted Sweet Potatoes and Parsnips

Slightly Modified from Bon Appetit - October 2010 (Molly Stevens)

Ingredients

  • 1/2 teaspoon ground cumin
  • 2 medium parsnips, peeled, cut into 1/2-inch cubes
  • 2 medium sweet potatoes, peeled, cut into 1/2-inch cubes
  • 1/2 red onion, thinly sliced
  • 5 tablespoons vegetable oil, divided
  • 1 teaspoon chili powder
  • 1/2 teaspoon dried oregano
  • 1 teaspoon kosher salt
  • 2 large garlic cloves, peeled
  • 1 anaheim pepper, halved, seeded
  • 2 cups coarsely chopped fresh cilantro
  • 1 4-ounce can diced green chiles, drained
  • 1 jar tomatillo salsa (MM Recommendation: Frontera)
  • 1/2 cup sour cream, divided
  • 8 ounces cooked, peeled, de-veined shrimp, coarsely chopped
  • 12 5 1/2- to 6-inch-diameter corn tortillas
  • 8 ounces crumbled queso fresco or feta cheese (about 2 cups)

Directions

  • Preheat oven to 400°F. Combine parsnips, sweet potatoes, and red onion in large bowl. Add ground cumin, 2 tablespoons vegetable oil, chili powder, oregano, and 1 teaspoon coarse salt; toss to coat. Transfer to baking sheet. Roast vegetables until soft and browned in spots, turning occasionally, 35 to 40 minutes. Cool. (Note: This could be prepared the day before - just refrigerate and allow to come back to room temperature before assembling the enchiladas).
  • Reduce oven temperature to 375°F. With machine running, add garlic and jalapeƱo through feed tube of processor and process until finely chopped. Add cilantro and drained green chiles. Using on/off turns, process until coarse puree forms. Add salsa; process to blend. Transfer salsa mixture to large deep skillet. Add 1/4 cup sour cream and stir over medium-low heat just until warm (do not allow to boil). Remove from heat. Cover and keep warm.
  • Measure 1 cup roasted vegetables; set aside. Transfer remaining vegetables to processor. Using on/off turns, process until coarsely chopped. Transfer to large bowl.
  • Heat remaining 3 tablespoons oil in medium skillet over medium-high heat. Working with 1 tortilla at a time, cook until just softened, about 15 seconds per side (do not allow to brown). Transfer tortillas to paper towels to drain.
  • Spread 1/2 cup salsa mixture over bottom of long baking dish. Place 1 tortilla on work surface; sprinkle generous 2 teaspoons crumbled cheese down center. Top with generous 1/4 cup roasted vegetable filling, and sprinkle with chopped shrimp. Roll up tortilla and place, seam side down, in prepared dish. Repeat with remaining tortillas, cheese, and filling. Scatter reserved 1 cup roasted vegetables over enchiladas. Spoon remaining salsa mixture over. Sprinkle with any remaining cheese. Bake enchiladas until heated through, about 20 minutes.

Wednesday, September 29, 2010

Food: Chili-Rubbed Steak Tacos with Cucumber-Avocado Salsa

It's football season...and the end of summer. So what could be better than some warm, spicy, steak tacos with a hit of tart, citrusy lime, and cooling avocado and cucumber? This meal is a reminder that the warm weather isn't quite gone yet -and- it's a more grown up and tangy tailgating treat than blah, blah, boringly simple burgers and brats. The "salsa" has quite a bit of lime juice in it...so it keeps quite well when stored in the refrigerator overnight. In fact, if you have leftovers, feel free to lose the corn tortilla and make a simple salad out of the salsa and shredded cabbage...add a little bit of crumbled feta and you have a refreshing lunchtime treat. And (can you keep a secret), did I mention this meal as a whole is pretty darn healthy? Bonus! This is definitely a recipe to add into your monthly rotation.


Chili-Rubbed Steak Tacos with Cucumber-Avocado Salsa
Adapted from Ellie Krieger - Food Network

INGREDIENTS
  • 1 tablespoon chili powder
  • 2 cloves garlic, minced
  • 1/4 teaspoon ground cinnamon
  • 1/4 teaspoon salt
  • A pinch cayenne pepper
  • 1 1/2 pound top sirloin steaks cut 1-inch thick
  • 12 small corn tortillas (5 to 6 inches in diameter)
  • 3 cups shredded red cabbage (MM Tip: Buy a pre-shredded bag from the salad section)
  • 1/2 cup chopped cilantro leaves
  • 1 lime, cut into wedges
  • 2 cups Avocado Lime Salsa, recipe follows

DIRECTIONS

In a small bowl stir together chili powder, garlic, cinnamon, salt and cayenne pepper. Rub spice mixture on both sides of steaks.

Grill or broil steaks for 8-10 minutes on each side for medium-to-medium-well, turning once. Remove from grill and let meat sit for 10 to 15 minutes. Carve into thin slices.

Warm tortillas by placing them on the grill, for about 30 seconds, turning once. Wrap in foil to keep warm/steamed. Place the carved steak, warm tortillas, cabbage, cilantro, lime and Avocado Lime Salsa in serving dishes and let diners make their own tacos at the table.

Cucumber-Avocado Salsa:

  • 1 large English cucumber, cut into chunks (about 2 cups)
  • 2 avocados, cut into chunks
  • 2 limes, juiced
  • Salt
  • 1/4 cup chopped cilantro leaves
  • 1 hot Anaheim chile, seeded and chopped

Place cucumber and avocado in a large bowl and add lime juice and salt. Add cilantro and chiles and toss gently.

Monday, August 16, 2010

Food: Hungarian Hot Wax Peppers in Oil

In previous posts I've mentioned my parents' wonderful garden and how spoiled I was to have had constant exposure to fresh veggies during harvest season. And although I dearly love many of the vegetables that came straight from the patch (heirloom German tomatoes in particular), not many things can quite overtake my affection for Hungarian hot wax peppers.

I don't even know when my parents started planing hot peppers or why the Northeast Ohio area in particular tends to have so many people who plant the Hungarian wax variety. But let me share with you a super simple way to prepare them. These are not only fabulous, but they'll last in your fridge for several months, and they're an absolutely perfect condiment. I've put them in things like bread rolls stuffed with sopressata and kalamata olives, sandwiches, on top of fried eggs...And they're pretty darn good all by themselves, served as an appetizer along side cheese and crackers. As my pepper plant's production for the year is starting to dwindle, making these refrigerator peppers is definitely motivation to grow another Hungarian wax pepper on my patio again next year.


This recipe is relatively simple and if you use basic ratios, you can make batches in a more customized manner to suit your needs.

I generally use the following as a guideline:

Hungarian Hot Wax Peppers in Oil
Adapted from a recipe from a family friend

MM Tip: It's generally wise to wear rubber gloves when working with hot peppers to avoid an accidental swipe of them into your eyes later in the day since the oils remain on your hands.


INGREDIENTS
~15 Peppers - Sliced into thin strips, seeds removed
1 cup Cider or Distilled Vinegar
1 cup Water
2/3 cup Extra Virgin Olive Oil
1-2 large heads of garlic, diced
2 T Oregano
1 T Kosher Salt

DIRECTIONS
In a large bowl, combine all ingredients (minus the peppers) together and mix well. Stir in the peppers, cover with plastic wrap, and let stand overnight. Stir occasionally. Place the pepper mixture into a large jar with a lid and refrigerate. The peppers in oil will keep for months in the refrigerator.

Saturday, July 24, 2010

Food: Grilled Salmon with Blueberry Pan Sauce

One of my favorite, mid-summer finds at the market is fresh blueberries. So when July rolls around each year, I look forward to loading up my cart (and freezer at home) with several quarts of the purple skinned fruit. I mean what could be better than something that not only tastes awesome but has a major variety of uses and contains 25% of your daily Vitamin C and tons of antioxidants in one serving?!?

Blueberries bring back so many memories from when I was younger. My childhood neighbors had a huge blueberry patch in their backyard and those bushes provided the basis for countless blueberry muffins and pie and jam and pancakes and of course, lots of opportunities to just eat them plain on a fresh bowl of morning cereal.

When I moved to Michigan almost 10 years ago, some friends and I decided it was about time we found our own "you pick" blueberry patch and drove over the border to Canada to pick blueberries at Klassen's in Essex. It was a fun adventure but unfortunately a rather long haul from Detroit. So luckily, a couple of years ago, I discovered a Michigan patch that was closer and try to make an effort to take a summer afternoon each year to go picking. (BTW...A good website for finding "pick your own" places near you is: http://www.pickyourown.org).

Although my normal use for berries, when not just eating them plain, consists of traditional items like muffins and pancakes, when I received my Bon Appetit the other day, I knew I just had to make this recipe. I will admit I'm normally not the biggest fan of fruit sauces and fish (since most of them are too sweet). But this sauce was fresh and savory and nicely complimented the salmon and mashed sweet potatoes. The mint also provided a bright flavor which made the meal so well suited for the summer. And let me just say, there's really nothing like a quick, healthy meal to make you enjoy the hot summer weather while feeling fulfilled and refreshed.


Grilled Salmon with Quick Blueberry Pan Sauce
From: Bon Appetit - August 2010 Issue
Recipe by Lori Longbotham

Ingredients

  • 1 tablespoon olive oil plus additional for brushing
  • 3/4 cup sliced shallots
  • 1 garlic clove, thinly sliced
  • 1/4 teaspoon coarse kosher salt plus additional for seasoning
  • 1/4 teaspoon chopped fresh thyme plus additional for seasoning
  • 1/8 teaspoon ground allspice plus additional for seasoning
  • 1 cup fresh blueberries
  • 1/4 cup water
  • 1 tablespoon balsamic vinegar
  • 4 7-ounce salmon fillets (each about 3/4 inch thick)
  • 3 tablespoons thinly sliced fresh mint, divided


Preparation

  • Heat 1 tablespoon oil in large skillet over medium heat. Add shallots; sautĆ© until softened, about 5 minutes. Add garlic, 1/4 teaspoon coarse salt, 1/4 teaspoon thyme, and 1/8 teaspoon allspice. Stir until fragrant, about 30 seconds. Add blueberries, 1/4 cup water, and vinegar. Stir to blend. Mash berries with potato masher or back of fork and cook until sauce thickens, stirring often, 3 to 4 minutes. Season with freshly ground black pepper. Remove from heat. DO AHEAD Can be made 2 hours ahead. Let stand at room temperature. Rewarm before using.

  • Brush grill rack with oil. Prepare barbecue (medium-high heat). Brush salmon on both sides with oil; sprinkle with coarse salt, thyme, allspice, and black pepper.

  • Grill salmon until just opaque in center, 4 to 5 minutes per side. Transfer to plates. Stir 2 tablespoons sliced mint into warm blueberry sauce. Spoon sauce over salmon and sprinkle with remaining 1 tablespoon mint. Serve immediately.

Sunday, July 18, 2010

Food: Zucchini Pesto

OK...I know I'm hugely guilty of not posting things in over A MONTH. But did I mention my little sister was getting married? The wedding was actually this past weekend...and it was beautiful and fun and EXHAUSTING :) So now that I've had a little recovery time, I'm back in the game for sharing more recipes with you.

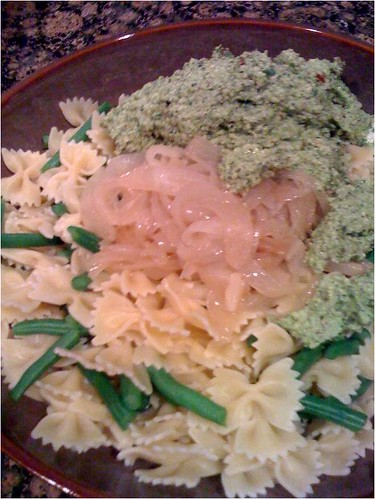
Farmers Markets are in full swing now. And it couldn't be better that one of my favorite veggies (zucchini) is in abundance (along with other wonderful summertime produce). So in case you still have a bunch of it in your fridge right now, or a craving for a wonderful summer dish, here's a quick and easy pasta recipe that uses a couple of zucchini as the base for a fresh, pesto-style sauce.

Also, if you happened to make my Sugo-stype caramelized onions in bulk and froze some, these work perfectly in this dish. If you don't have any, though never fear. You can caramelize some in the skillet using a quicker-cooking method. If you don't know how to do this, drop me a note and I'll post some instructions.


Zucchini Hazelnut Pesto with Bowties
Adapted from Bon Appetit, Oct 2009

Ingredients
  • 1 small zucchini (~2 cups shredded)
  • 2/3 c toasted hazelnuts
  • 2 T fresh lemon juice
  • 1 T finely grated lemon peel
  • 2 garlic cloves, peeled
  • 1 c plus 1 T olive oil
  • 1/2 t truffle salt
  • A handful of fresh green beans, stemmed and snapped in half
  • 1 14.5 oz box of bow tie pasta
  • 1/3 c freshly grated parmesan cheese
  • Caramelized onions
Directions
  • Fill a pot with enough water to cook one box of pasta, salt generously, and bring to a boil. Cook pasta per directions.
  • When pasta is al dente, reserve 1 c of cooking liquid. Then drain, return to cooking pot, toss with 1T olive oil, and set aside.
  • In a food processor, combine zucchini, hazelnuts, lemon juice, truffle salt, and garlic. Slowly add olive oil in a steady stream until the mixture resembles a thick, green sauce.
  • In a small pan, add a couple of tablespoons of water, heat to medium, and steam green beans a few minutes until cooked but slightly crispy.
  • Toss bowties with "pesto" and green beans. Top with caramelized onions and freshly grated parmesan and serve!

Saturday, June 5, 2010

Food: Glenda's Glorious Rhubarb Pie

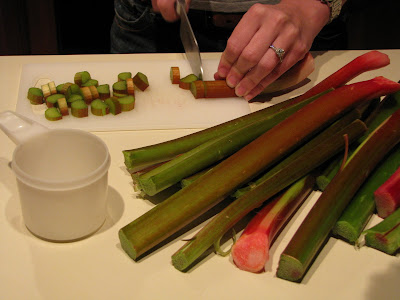
Sometimes I like things that are a little different, things that aren't what they appear to be. Which is probably one of the underlying reasons as to why I like rhubarb. Rhubarb likes to play outside of its designated category...like a tomato, for example. A tomato, although a fruit, is generally not found in a fruit salad or a fruit smoothie (and for good reason...). So is the case for rhubarb when it comes to the vegetable world. Although it is a vegetable, rhubarb won't ever be seen in a succotash or a ratatouille. Instead this veggie prefers to be slightly sweetened and baked into a pie or stewed into a sweet, tangy, warm, gobby mess of goodness.

The recipe I'm sharing with you today is right at the top of my 10 favorite things to eat. And I'm sure some of you who have never had rhubarb are thinking I must be nuts. But trust me. This is a dessert I often requested in the spring when growing up (and still request even now as an adult). A couple of years ago I discovered a local pie place carried rhubarb pie, and you can imagine I was pretty excited. But it truly doesn't hold a candle to the recipe below.

DISCLAIMER: I know parts of this probably came out of a cookbook at some point, so I'm making a disclaimer in advance that if you know where this recipe originated, please send me an e-mail with the source…I want to give credit where credit's due…especially in the case of one of my favorite things :)

Besides my mom's classic pie recipe, here are a couple of other ways you should try rhubarb:


Glenda's Glorious Rhubarb Pie

via MM's Mom


INGREDIENTS


Crust

  • 2 c flour
  • 1 t salt
  • ⅔ c plus 2 T shortening
  • 5 T cold water

Filling

  • 1⅓ to 1⅔ c sugar
  • ⅓ c flour (MM note: or more...this is your thickening agent)
  • ½ t grated orange peel
  • 4 c fresh rhubarb (cut into ½" pieces)
  • 2 T butter

DIRECTIONS


Crust


- Combine flour and salt in a bowl and cut in shortening with a pastry cutter. Make sure shortening is thoroughly combined.

- Sprinkle in water and mix to form dough.

- Roll dough into two, round pie crusts.

- Line pie pan with one crust, set the other aside.


Filling

- Heat oven to 425 degrees.

- Stir together sugar, flour and orange peel.

- Place half of the rhubarb into pastry lined pie pan and sprinkle with half of the sugar mixture.

- Repeat with remaining rhubarb and sugar; dot with butter. Cover with top crust, cut slits in top,sprinkle with sugar. Cover edges with strips of foil to prevent excessive browning.

- Bake 40 to 50 min. until juices begin to bubble through slits in crust.

- Remove foil the last 15 minutes of baking.

Thursday, May 20, 2010

Food: Thai Chicken Burgers

I apologize for the lack of recipe posting the past few weeks. I've been doing a lot of traveling and a lot of working outside...so generally when I have had some time to spend on the computer I've been too exhausted to do so. I know I have some catching up to do.

The night I decided to make this recipe, I came in from working in the yard to discover the power was out. So between being exhausted from a full day outside, an ice cold shower in the dark, and being worried each time I opened the refrigerator, I wasn't quite sure if I even wanted to make dinner anymore. And when I continued on my way to mixing together these "burgers," I wasn't quite sure how they'd turn out seeing as I measured and mixed together the items by the light of two candles. I was definitely thinking I might have to make a late night pizza run.

But, I ended up having luck on my side. The entire meal could be prepared and cooked without power. The chicken patties turned out better than perfect (nicely spiced with a crisp, outer shell). And the power came back on right before we were ready to eat - so we could actually see what we were eating.

A simple salad to throw together to go alongside this tasty sandwich involves mixing together a bag of broccoli slaw, ~1/2 c bean sprouts, roasted peanuts, and shitake mushrooms and tossing the mixture with the peanut-lime dressing I usually reserve for soba noodles.

This is definitely a "burger" recipe that is being added to my summer grilling rotation.


Thai Chicken Burgers

MM Original

INGREDIENTS

  • 1 lb ground chicken
  • 2 t hot curry powder
  • 1/3 c coconut milk
  • 1/2+ c panko bread crumbs
  • 1/4 c fresh cilantro, finelt chopped
  • 1 T Thai Red Chile Paste
  • 2 T natural peanut butter
  • 1/4 t kosher salt
  • Vegetable Oil (Use a neutral flavored oil like Smart Balance)

TOPPINGS

  • Round pear slices
  • Sesame topped egg buns

DIRECTIONS
Combine all ingredients (except the oil) in a large mixing bowl, using your hands to ensure a consistent mixture throughout. The mixture should not be sticky, so keep adding panko until you get a nice "hamburger" style texture.

Form mixture into 5-6 uniform patties. Brush oil on both sides.

Grill on Direct, Medium-High heat for 8-10 minutes until cooked through, turning once during cooking process. Feel free to brush a little more oil on the patty as it cooks.

Top with a sliced pear and serve on a fresh, sesame egg bun.

Thursday, April 29, 2010

Food: Soba Noodles

Now that we've seen some 80 degree temps here in Detroit (OK...so not 80 degrees consistently, just scattered here and there like the tree pollen all over my driveway), I've started thinking about summer foods. For example, burgers (or rather anything) on the grill, fresh seafood, salads... So today I've decided to share with you one of my favorite, one-dish, "salad" recipes for the warm weather - Peanut Soba Noodles.
This is one of my standard summer staples. It's fresh, super easy and quick, tastes of wonderful Asian flavors, has hearty and good-for-you Soba (Japanese buckwheat) noodles, and is scattered with veggies galore. Just thinking about crunchy and slightly spicy, thinly sliced radishes, sweet and crisp sugar snap peas, and cilantro (yes, those of you who think this tastes like soap can leave it out but you really don't know what you're missing) is enough to get my mouth watering. It also has one super special ingredient that I'm sure you won't mind using on a sandwich or some crackers later - gooey but super tasty natural peanut butter (yes, the stuff that you have to stir and put in the fridge afterwards).

I know you're going to enjoy this one because not only is it fast, tasty, and fresh, it's one of those things that after you make it once you don't really follow a recipe any more...you just begin to throw in whatever strikes your fancy - shredded carrots, golden raisins, green onion, diced apple, water chestnuts, bok choy, etc. - you get the picture. It also keeps very well in a container to throw in your lunch box - in case you want to take some to work for your lunch (eating them with chopsticks, of course). But pack a napkin and a Tide pen just in case you're a little sloppy with the noodles :)

I think I'll have a second helping.


Asian Peanut Soba Noodles
MM

INGREDIENTS
  • 8 oz of soba noodles (or one package), cooked per instructions, drained, and rinsed well (use your fingers to help you get each individual noodle rinsed)
  • 3 T fresh peanut butter
  • Juice and zest from 1 lime
  • 1 T low sodium soy sauce
  • 1 T rice vinegar
  • 1/2 T sriracha (you can always add more on top once you serve it)
  • 1 T honey
  • 1/4 c fresh, chopped cilantro
  • 4 radishes, thinly sliced
  • 1 handful of sugar snap peas
  • 1/4 c roasted peanuts

DIRECTIONS
  • In a bowl, whisk together the peanut butter, soy, lime, vinegar, sriracha, and honey
  • Toss together with the cooked/drained/rinsed soba noodles, cilantro, radishes, sugar snap peas, and peanuts
  • Serve in bowls and slurp up with chop sticks (or twirl around a fork like you're eating pasta)!

Tuesday, April 20, 2010

Food: Lamb Chops with Chipotle-Cherry Sauce and Wild Rice Cakes


When I was younger I didn't have much exposure to lamb. That is with the exception of an occasional Greek gyro at the county fair...the kind that's wrapped in foil to gently steam the pillowy pita, filled with seasoned, processed, rotisserie meat that melts in your mouth, and topped with cool Tzatziki sauce, warm tomato slices and paper-thin onion slices. But this isn't really something a purist would consider to be a true lamb experience...so I guess it doesn't truly count.

It wasn't until a few years ago I had even thought to make anything with lamb. Which I suppose could be seen as strange with all of the recipes I would continually see on television cooking shows and in my magazine subscriptions. I'll admit I was fairly intimidated by it since I lacked familiarity. So if you haven't cooked lamb yet, never fear, we all were in the same position once.

If you're a newbie, I recommended starting with lamb chops. They seem fancy but are surprisingly simple to cook and work wonderfully when prepared just like a simple steak - with a brushing of olive oil and a sprinkle of salt and pepper. And even though they are kind of a pain to get all of the meat off the little bones when eating, they taste quite lovely.

I was given a cookbook years ago called Contemporary Southwest - The Cafe Terra Cotta Cookbook by Donna Nordin (you can still purchase it here). Although there are a lot of great Southwestern-style recipes in this book, this is one of my favorites. It's fairly simple and a modern take on what you would expect to be served in an upscale restaurant in New Mexico or Arizona. It's hearty, simple, yet elegant. And very flavorful and satisfying.

I like a lot of things about this dish. First, the smoky, spicy, and sweet sauce, next, the hearty, chewy, nutty, rice cakes, and third the warm, earthy lamb. The cakes reminded me of something I might have had at a contemporary vegetarian restaurant like Cafe Sunflower in Atlanta and I highly recommend them as a side dish for any sort of meat dish -or- as a main element of a hearty vegetarian meal.


Lamb Chops with Dried Cherry-Chipotle Sauce

Ingredients
  • 1/2 cup sun-dried cherries
  • 1 small onion, diced
  • 2 garlic cloves, finely chopped
  • 1 T olive oil
  • 1 cup chicken stock
  • 1/2 c dry red wine
  • 2 small chipotle peppers (canned chipotles in adobo), chopped
  • Lamb Chops
Directions
  • Soak the cherries in enough water to cover overnight or for at least one hour. Do not drain (you will be using the liquid).
  • Saute the onion and garlic in the olive oil over medium heat until slightly caramelized.
  • Add the cherries and their soaking liquid, stock, and wine, and simmer until the liquid is reduced by half. Add the chipotle peppers.
  • When the mixture has cooled, pour into a blender and puree. Season with salt and pepper to taste.
  • Preheat the broiler in the oven. Lightly coat the lamb chops with olive oil and sprinkle with salt and pepper. Place under the broiler (~4-6" away from the heat). Cook for 5-6 minutes per side or until desired doneness (this will accomplish med-to-med well for 1" thick chops).
  • Balance on top of rice pancakes and drizzle with chipotle cherry sauce.

Wild Rice Pancakes

Ingredients
  • 1 cup wild rice (dry)
  • 2 stalks celery, chopped
  • 4 green onions, sliced thinly (both whites and tops)
  • 2 cloves garlic, chopped
  • 1/2 t cayenne pepper
  • 1 t kosher salt
  • 4 eggs, lightly beaten
  • 1/2 c flour
  • Cooking spray
Directions
  • Prepare the rice according to package instructions (Most wild rice blends will cook 1 part rice to 2 parts water, simmering covered for 50 minutes with 10 minutes of rest).
  • Combine the celery, onions, garlic, and seasonings and set aside.
  • When rice cools slightly, add to the vegetable mixture. Stir in the eggs and then the flour to form a moist batter.
  • Heat a non-stick pan over medium-high heat. Coat bottom with cooking spray.
  • Spoon batter onto pan, pressing down with the spoon to form pancake shaped patties.
  • Cooked until golden brown approximately 2-3 minutes per side.

Wednesday, April 7, 2010

Food: Banana Coconut Cake

When Jonathan's parents were in town a couple of weekends ago, I decided to bake them a birthday cake (his Mom's birthday was on St. Patrick's Day and his Dad's birthday was right before Easter). I had originally planned to make this, but didn't realize chocolate had been given up for Lent. So I decided to whip up something a little more tropical...and (selfishly) make a recipe that had been taunting me for weeks sitting at the top of my literal stack of things to try.

Regarding the fully assembled cake, if you want a little less raw banana flavor, I'd recommend finding a recipe for caramelized bananas and use those in the middle instead of raw slices (they were a little tart tasting since they were raw). Also, I didn't have two cake pans so I cooked one layer and then the other, trying to make sure the batter was about equal. It worked out just fine...only took a short time longer than baking both layers at one time. And make sure your custard is cooled completely before applying. A spatula/"spoonula" like this works great for scooping and then spreading. Putting the coconut on the cake will make a mess all of the countertop...but when you see how pretty the finished product turns out, you won't be complaining. Besides, the countertop coated with toasted coconut is relatively easy to clean up (luckily it's not sticky).


Banana Coconut Cake
Adapted from the Food Network

INGREDIENTS

Cake
  • 7 oz unsalted butter
  • 1 1/2 c sugar
  • 1/2 c buttermilk
  • 3 extra large eggs
  • 2 large ripe bananas, mashed
  • 1 1/3 c all purpose flour
  • 1 t baking powder
  • 1/2 t salt
  • 1 t baking soda
  • 1/3 c roughly chopped hazelnuts
Filling (Coconut Custard)
  • 1, 13.5 oz can unsweetened coconut milk
  • 1 c skim milk
  • 2/3 c sugar
  • 5 egg yolks (MM Tip: You can freeze the egg whites to save them for another use...thaw in the refrigerator overnight prior to use)
  • 1/3 c cornstarch
Other
  • 2 bananas, sliced
  • Zest from one orange
  • Fresh juice from one orange
  • 1 T sugar
  • 1 bag unsweetened coconut flakes, gently toasted on the stove top until golden brown (be careful not to burn)

DIRECTIONS

Cake

  • Preheat the oven to 350 degrees
  • Butter and flour one 9-inch cake pan
  • In the bowl of an electric mixer, beat the butter and sugar together until it is light and fluffy
  • Add the eggs one at a time, beating well in between each addition, and continue to beat until very light and fluffy
  • Add buttermilk and mashed banana and mix well
  • In a separate bowl, sift dry ingredients together (flour, baking soda, salt, baking powder), then add to batter and mix at low speed on the electric mixer until moistened
  • Fold in hazelnuts and pour 1/2 of the batter into the prepared cake pan (If you have two, 9-inch pans, you can bake both of these at one time)
  • Bake for 25 to 30 minutes, until a toothpick inserted in the center comes out clean
  • After removing the cake from the oven, allow them to cool for five minutes, then invert onto a cooling rack
  • Repeat with second half of the batter
  • Assemble cake when thoroughly cooled
Coconut Custard
  • Combine the coconut milk and milk and stir together
  • In a bowl, mix 2/3 cup of sugar with 1/3 cup cornstarch and stir with a fork until free from lumps
  • Mix the sugar and cornstarch together with the egg yolks and 1 cup of coconut milk mixture; Whisk until smooth and set aside
  • In a heavy saucepan, bring the remaining coconut milk mixture to a boil and then pour it into the bowl with the egg yolk-sugar mixture, whisking constantly
  • Return the mixture to the saucepan over medium and continue stirring, cooking until small bubbles start to form on the surface - you have just made custard!
  • Remove from the heat and pour into large, wide bowl
  • Cover the top of the custard with a sheet of parchment touching the surface to prevent a skin from forming
  • Cool completely in the refrigerator
To assemble the cake
  • In a large bowl, gently toss banana slices with the orange juice, zest, and sugar
  • Place one cake layer on a serving dish or cake plate
  • Spread over the top of the layer with a thin coating of custard
  • Place bananas completely over bottom layer, so that no cake is showing
  • Spread with another layer of coconut custard over the top of the bananas
  • Place the second cake layer on top of the first and generously cover the entire cake with coconut custard
  • Garnish liberally with toasted coconut flakes
Related Posts with Thumbnails