Showing posts with label Quick Meals. Show all posts

Saturday, July 24, 2010

Food: Grilled Salmon with Blueberry Pan Sauce

One of my favorite, mid-summer finds at the market is fresh blueberries. So when July rolls around each year, I look forward to loading up my cart (and freezer at home) with several quarts of the purple skinned fruit. I mean what could be better than something that not only tastes awesome but has a major variety of uses and contains 25% of your daily Vitamin C and tons of antioxidants in one serving?!?

Blueberries bring back so many memories from when I was younger. My childhood neighbors had a huge blueberry patch in their backyard and those bushes provided the basis for countless blueberry muffins and pie and jam and pancakes and of course, lots of opportunities to just eat them plain on a fresh bowl of morning cereal.

When I moved to Michigan almost 10 years ago, some friends and I decided it was about time we found our own "you pick" blueberry patch and drove over the border to Canada to pick blueberries at Klassen's in Essex. It was a fun adventure but unfortunately a rather long haul from Detroit. So luckily, a couple of years ago, I discovered a Michigan patch that was closer and try to make an effort to take a summer afternoon each year to go picking. (BTW...A good website for finding "pick your own" places near you is: http://www.pickyourown.org).

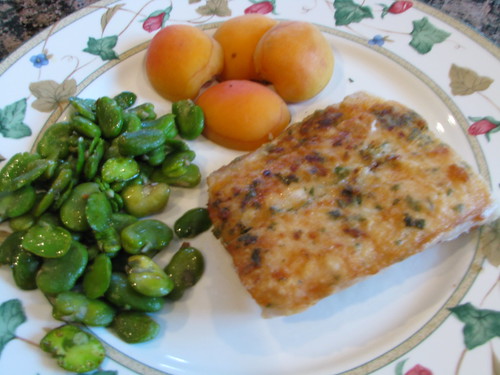
Although my normal use for berries, when not just eating them plain, consists of traditional items like muffins and pancakes, when I received my Bon Appetit the other day, I knew I just had to make this recipe. I will admit I'm normally not the biggest fan of fruit sauces and fish (since most of them are too sweet). But this sauce was fresh and savory and nicely complimented the salmon and mashed sweet potatoes. The mint also provided a bright flavor which made the meal so well suited for the summer. And let me just say, there's really nothing like a quick, healthy meal to make you enjoy the hot summer weather while feeling fulfilled and refreshed.


Grilled Salmon with Quick Blueberry Pan Sauce
From: Bon Appetit - August 2010 Issue
Recipe by Lori Longbotham

Ingredients

  • 1 tablespoon olive oil plus additional for brushing
  • 3/4 cup sliced shallots
  • 1 garlic clove, thinly sliced
  • 1/4 teaspoon coarse kosher salt plus additional for seasoning
  • 1/4 teaspoon chopped fresh thyme plus additional for seasoning
  • 1/8 teaspoon ground allspice plus additional for seasoning
  • 1 cup fresh blueberries
  • 1/4 cup water
  • 1 tablespoon balsamic vinegar
  • 4 7-ounce salmon fillets (each about 3/4 inch thick)
  • 3 tablespoons thinly sliced fresh mint, divided


Preparation

  • Heat 1 tablespoon oil in large skillet over medium heat. Add shallots; sauté until softened, about 5 minutes. Add garlic, 1/4 teaspoon coarse salt, 1/4 teaspoon thyme, and 1/8 teaspoon allspice. Stir until fragrant, about 30 seconds. Add blueberries, 1/4 cup water, and vinegar. Stir to blend. Mash berries with potato masher or back of fork and cook until sauce thickens, stirring often, 3 to 4 minutes. Season with freshly ground black pepper. Remove from heat. DO AHEAD Can be made 2 hours ahead. Let stand at room temperature. Rewarm before using.

  • Brush grill rack with oil. Prepare barbecue (medium-high heat). Brush salmon on both sides with oil; sprinkle with coarse salt, thyme, allspice, and black pepper.

  • Grill salmon until just opaque in center, 4 to 5 minutes per side. Transfer to plates. Stir 2 tablespoons sliced mint into warm blueberry sauce. Spoon sauce over salmon and sprinkle with remaining 1 tablespoon mint. Serve immediately.

Sunday, October 25, 2009

Food: Orange Pan-Glazed Tempeh

I don't like to admit failure. But I know when you decide to try out different recipes almost every weekend, sometimes things are going to be a flagged a failure. You just have to hope that you have more hits than misses to avoid giving your kitchen skills a messy reputation. That, and you have to be thankful to have a boyfriend who enjoys trying new things and doesn't insist that everything be plain and boring and all meat and potatoes :)
A few weekends ago I made something that in theory was supposed to be warm, nutty and comforting with lovely asian flavors like soy, ginger and orange served on a bed of chopped kale. But what I ended up with was something Jonathan and I both intensely disliked - so much so, when I tried to eat the leftovers the day afterwards (why do I have to feel guilty about wasting food?), I felt slightly ill after doing it. Lesson learned.
It's such a shame. The recipe sounded good, offered a chance to try a new, unusual ingredient (tempeh from Trader Joe's) and looked wonderful (I am always enticed by Heidi's lovely photos on 101 Cookbooks). I must apologize to her that we did not enjoy the recipe as much as I had hoped. I promise to try something else on her site soon to make up for this foiled attempt. And I apologize to all those tempeh fans out there that I haven't yet grown to love it. Maybe someone can share a better recipe with me to change my mind?

Monday, September 14, 2009

Food: Five Spice French Toast

Although my typical breakfast is a bowl of cereal or fresh fruit and yogurt, my favorite types of breakfast foods fall into the "weekend" category (i.e. the things you probably shouldn't eat every day since they're heavier in fat and calories...but we won't mention that part, will we?). I place these "special occasion" foods into two categories: savory and sweet. On the savory side I love Greek-style omelets, huevos rancheros, grandma's buttermilk biscuits with sawmill gravy...you're getting the picture, right? But on the sweet side, besides my mom's whole wheat, blueberry pancakes, my favorite food is French toast.


I would describe the perfect French toast as piping hot, crisp on the outside and slightly doughy in the middle, with a custardy constitution reminicent of bread pudding. It's a food that is most definitely completely about texture and warmth with a touch of sweetness and spice. Thinking about this, several weeks ago I decided to modify my normal recipe adding some orange extract and five spice flavor to give it a warm and citrus-infused flavor. We found it to be a nice departure from the traditional cinnamon and vanilla version. Also, if you're wondering about a trick to make the toast both flavorful and crispy, I've found that using a combination of both butter and oil in the skillet works the best.

This recipe holds up well if in case you have leftovers and decide to freeze some slices. Just heat them up in the toaster oven when you're ready to finish them off. Jonathan and I had a couple of slices in place of toast last weekend with our cereal...and they were perfect even without adding any sort of toppings.

five spice, french toast, oil, butter, bread, motown maiden, detroit, breakfast
Five Spice French Toast

MM


Ingredients

  • 4 large eggs, beaten until slighly frothy
  • 1 c milk
  • 2 T sugar
  • 1/2 t five spice powder
  • 1/2 t orange extract
  • 1 t vanilla extract
  • 3/4 loaf french or vienna bread, cut into thick slices
  • 1T butter
  • 1T light-flavored cooking oil (I used Smart Balance)

Directions

  • Place 1 T butter and 1 T oil in a skillet and pre-heat stovetop to medium heat
  • In a large, shallow bowl, stir together eggs, skim milk, sugar, five spice powder and orange and vanilla extract
  • One slice at a time, dredge the bread through the egg mixture soaking approximately 5 seconds per side until it is soaked through
  • Place the bread in the pre-heated pan and cook for 2-3 minutes a side on medium heat until cooked completely and nicely browned on both sides
  • Plate and serve

Wednesday, August 26, 2009

Food: Miguel's Fish Tacos

Most of us who like to cook know the love of preparing and enjoying dishes isn't just about our own satisfaction, it's about sharing our sweat (and sometimes tears) with others. Cooking is truly about nurturing and nourishing both the body and the soul and definitely about companionship. As a result, I can't think of a memorable dish without associating my experience with a person or group of people I care about.

When I think of food with family and friends, this is one of the first recipes that comes to mind. A couple of years ago, Jonathan and I visited our friends Miguel and Anna in Atlanta. The pair are truly the most wonderful hosts and do everything they can to ensure your comfort. Since part of this hosting responsibility involves satisfying rumbling tummies, Anna and Miguel definitely didn't let us go hungry. One unforgettable meal from the weekend involved Miguel's fabulous fish tacos (and not because one of the dogs decided to dip his nose in the guacamole on the counter and show all of us his creamy, light green beard).

I'll let you in on a secret - not only are Miguel's tacos excellent because they taste incredible, but because they're super, super simple. The concept is relativey easy - so much so, I'm not even going to prepare a formal recipe for you, just provide you with some basic instructions.

First, you're going to take fresh filets of tilapia (figure 1-1.5 per person), rinse them in some cool water and pat dry with a paper towel. Next you'll decorate the filets by seasoning them heavily with "Old Bay" brand seasoning on both sides and some freshly squeezed lime juice (just cut the lime in half and let your hands do all the dirty work - don't be afraid to get them all citrus-sticky). After you're done doing this, cover the fish in plastic wrap until you're ready to cook, placing them in the refrigerator if you don't plan to grill for a while.

When you're ready to fire it up, grease the grill ("Pam Grilling" cooking spray will do the trick) and pre-heat to medium-high heat. When it's reached the desired temperature, place the fish on the hot grate and cook for approximately five minutes, turning mid-way through and dousing with beer a couple of times during the cooking process (I generally pick a bottle of what ever we have in the fridge. This past time it was Negra Modelo).

When the fish is fully cooked, lightly shred the filets with a fork and put them in a large serving bowl. Then serve them up with some shredded red cabbage, fresh salsa, homemade guacamole (my easy proportions for "perfect guacamole" can be found
here) and freshly toasted corn tortillas. And if you're wondering the trick for cantina-style tortillas, heat them on the grill while the fish is cooking and then wrap them in foil until ready to serve.

What could be easier and more delicious? I think you'll be very pleased with the results - and the smiling faces. Buen provecho!


fish tacos, motown maiden, detroit, atlanta, salsa, guacamole, quick mealsfish tacos, motown maiden, detroit, atlanta, salsa, guacamole, quick meals
fish tacos, motown maiden, detroit, atlanta, salsa, guacamole, quick meals

Monday, August 17, 2009

Food: Pesto with Zucchini

My little Riley is at "summer camp" at my parents' house since my current assignment doesn't give me very good hours for picking her up at doggie daycare (7 hours of travel time Mondays and Thursdays is a huge burden on a girl's schedule). When I dropped her off for her many weeks of fun, my mom loaded up my car with fresh basil, zucchini, and raspberries! Oh how I miss living in a house with a big garden!

Jonathan and I polished off the raspberries almost instantly. And knowing I needed to make something with the basil and zucchini before I went out of town for a week, I remembered reading about Molly's dinner party (from her book "A Homemade Life") where she used these two ingredients as key flavors in a wonderful pasta dish. The pesto recipe below is my own, and unlike most store-bought versions, I prefer it to be hand chopped due to the nice, homemade texture it lends. I also like a dollop of sour cream on the side for a hint of tartness (I grew up with a creamy version of pesto spread over rotini noodles that was basically pesto blended in with sour cream and parmesan). This is an easy and super fresh lunch (or dinner) idea and is perfect for this time of year - especially since zucchini and basil are in abundance.

Pesto, Zucchini, Motown Maiden, Orangette, Molly, Linguine, Basil, Garlic
Basil Pesto and Zucchini
MM, Inspired by and adapted from Orangette

Ingredients
  • 2 large bunches of basil, leaves only, washed and dried
  • 3 medium cloves of garlic
  • 1 small handful of raw pine nuts
  • 1/2 cup of loosely packed Parmesan (freshly grated)
  • 3-4 Tb of extra-virgin olive oil
  • 2 large, garden fresh zucchini
  • 1 package of long, pasta noodles (I used linguine)

Directions

  1. On a large cutting board, roughly chop the basil
  2. Add the garlic and pine nuts, further chopping to combine. Chop until the garlic and pine nuts are fine bits
  3. Fill a large pot with water and place over high heat, salt generously and bring to a boil (once it reaches a boil, slightly reduce the heat to prevent water from spilling over the edges of the pot)
  4. While the water heats, carefully slice the zucchini into thin, long slices (use a mandoline for the best effect)
  5. Place the zucchini slices into the pre-heated water for 6 minutes or so (just enough time to cook them but not become mushy)
  6. Drain the zucchini and place aside (do not get rid of the hot cooking water!)
  7. Add the pasta to the cooking water and prepare as directed on the box for al dente
  8. Drain pasta, toss with pesto and zucchini and serve with some freshly shaved parmesan (I like to use a vegetable peeler to make nice curls) and a dollop of sour cream on the side (if you'd like, this is optional)

Monday, July 27, 2009

Food: Swordfish Milanese

I don't normally fear cooking new foods, but for years, swordfish struck me as being very intimidating. I could probably attribute some of this hesitation to the first time I tried the fish. Years ago when I attended my very first Homecoming dance in High School, my date treated me to dinner at a nice restaurant. It was here I tried swordfish for the first time, and as with many foods we try for the first time, it seemed so exotic and different - something almost out of reach. And since it's not something you see on menus very often, it was years after ordering swordfish for the first time that I tasted it again. However, due to this recipe by Giada De Laurentiis, I now eat (and cook!) it several times a year. So what is is about this recipe I love? Four Words: Fast, Simple, Crispy, Delicious.

Although I think the original recipe below is perfect (adapted for 2 rather than 4 servings), I tend to mix up what I serve with the basic fish. Normally I follow Giada's recipe and top it with a lemony, arugula salad. But this time I was in the mood for some sweet and tangy flavors (in addition to a summery Hoegaarden) and I ended up serving the fish with with a sweet-tart, three bean salad (recipe to follow in a future blog entry...for the salad, not the beer). .

Giada Swordfish Milanese Motown MaidenSwordfish Milanese

Original Recipe by Giada De Laurentiis

Ingredients:

  • 1 cups panko (Japanese bread crumbs)
  • 2 large eggs
  • 2 swordfish steaks, each about 1/2-inch-thick
  • Salt and freshly ground black pepper
  • 2 tablespoons unsalted butter
  • 2 tablespoons olive oil
Directions:
  • Place the panko in a pie dish.
  • In another pie dish, beat the eggs to blend.
  • Line a large cutting board with plastic wrap. Place 2 swordfish steaks on plastic wrap, about 2 inches apart. Place another sheet of plastic wrap over the steaks. Using the flat side of a meat mallet or a heavy rolling pin, gently flatten the swordfish steaks to 1/4-inch thick. Remove top plastic wrap and sprinkle the swordfish with salt and pepper on both sides. Set
  • Dip each steak into the egg, then the panko, coating completely and patting to adhere.
  • Melt 2 tablespoons of butter with 2 tablespoons of olive oil in a heavy large pan over medium-high heat. Place coated swordfish steaks in pan and cook until brown and crisp and just cooked through in the middle, about 1 1/2 minutes per side. Transfer to a cooling rack set on a baking sheet and lightly tent with foil to keep warm (do not seal with foil or the breading will become soggy).

Lemony Arugula Salad:

Ingredients:

  • 1 lemon, juiced
  • 2 tablespoons extra-virgin olive oil
  • 3 cups lightly packed arugula
  • 1 bunch watercress, stemmed

Directions:

  • Whisk the lemon juice and extra-virgin olive oil in a large bowl to blend.
  • Add the arugula and watercress, and toss lightly to coat.
  • Season the salad, to taste, with salt and pepper.
  • Transfer the swordfish steaks to plates. Top with the salad and serve.

Monday, July 20, 2009

Food: Summer Pasta

Here in Michigan, it's almost peak vegetable season. So we all know what that means...you can find fresh everything at the store and farmers' markets! A few weekends ago I threw together this pasta for a quick Friday night meal. It's super easy and simple - and would adapt really well to what every veggie you find at the store this week - zucchini, wax beans, etc. Just make sure to include the tomatoes and lemon since that's what helps create the "sauce."


Summer Pasta
MM

Ingredients
  • 1/3 cup extra virgin olive oil
  • Finely Grated Zest from one lemon
  • Juice from one lemon
  • 4 shakes of crushed red pepper
  • 1 bunch fresh asparagus, snapped into 1" pieces
  • 1/2 t salt
  • 10 oz grape tomatoes (i.e. one package)
  • 4 oz mushrooms (I used a package of pre-sliced, mixed variety)
  • 1 T chives, chopped
  • Freshly cracked pepper
  • 16 oz Pasta (I used Gia Rusa Whole Wheat Roman Rigatoni)
  • 3 oz, crumbled Feta Cheese

Directions

  • In a medium-sized, deep saucepan, heat oil over medium heat for a couple of minutes -or- until you can start to smell its aroma. Add lemon zest and crushed red pepper and heat for another 2 minutes. Add mushrooms and tomatoes and increase heat to medium-high.
  • After cooking for ~15 minutes, tomatoes should be tender enough to crush. Smash tomatoes with back of spoon (be careful when doing this so you don't splatter yourself - or the walls!), add lemon juice, asparagus, pepper, salt. Heat for another 5 minutes or so until asparagus is cooked yet still firm.
  • Meanwhile, heat generously salted water in a large pot on high heat. Once water is boiling, add pasta. Cook for 10 minutes (or until al dente - according to pasta instructions). Drain pasta. Pour "sauce" over pasta, add feta cheese, toss to coat.
  • Garnish with fresh chives.

Friday, July 10, 2009

Food: Flat Iron Steak, Orzo with Everything

Several weeks ago I followed the advice of Barbara Fairchild (Bon Appetit's Editor-in-Chief) to dig into the Epicurious archives and make a recipe called "Orzo with Everything." Looking for a quick but unusual side dish, I thought it sounded like a good bet. And I was right (or rather Ms. Fairchild was right). First off, the dish is extremely colorful - primarily due to the chopped bits of radicchio and basil. But the real treat is in the taste - it's definitely a party for your tongue. Who knew you could eat something that was bitter, sweet, tart, briny, tangy, fresh, cool, refreshing, crunchy, crisp and smooth all at one time? Wow! Jonathan and I loved this recipe and both had more than one helping. And we discovered it's even better the next day.

In terms of left-overs, besides eating the orzo on its own, buy a roast chicken, shred it and mix it in for a quick lunch-time salad that's easy to pack in a travel container. Or throw in some drained, rinsed black beans for a hearty, veggie alternative.

I served my "Orzo with Everything" alongside a simple, grilled, flat iron steak (my simple version is to lightly coat with olive oil, fresh cracked pepper, and kosher salt and throw it on a grill (medium, direct heat)).


Orzo with Everything
Bon Appétit July 1998

Ingredients

  • 1 1/2 cups orzo (rice-shaped pasta; about 10 ounces)
  • 1/3 cup (packed) chopped drained oil-packed sun-dried tomatoes
  • 5 tablespoons extra-virgin olive oil
  • 1/4 cup balsamic vinegar
  • 1/4 cup (packed) chopped Kalamata olives or other brine-cured black olives
  • 1 cup finely chopped radicchio (about 1 small head)
  • 1/2 cup pine nuts, toasted
  • 1/2 cup chopped fresh basil
  • 1/2 cup freshly grated Parmesan cheese
  • 2 large garlic cloves, minced

Directions

  • Cook orzo in pot of boiling salted water until just tender but still firm to bite. Drain well. Transfer to large bowl.
  • Add sun-dried tomatoes, oil, vinegar and olives and toss to blend. Let stand until cool. (Can be prepared 6 hours ahead. Cover and refrigerate. Bring to room temperature before continuing.)
  • Mix chopped radicchio, pine nuts, chopped basil, Parmesan and garlic into orzo mixture. Season salad to taste with salt and pepper and serve.

Wednesday, July 8, 2009

Food: Simple Pleasures - Roasted Red Pepper and Goat Cheese Sandwich

I'm not quite sure what I did before Trader Joe's. It was my first introduction to goat cheese (years ago I had a wonderful dip at their store consisting of warm goat cheese and bruschetta and I've been hooked on the musky cheese ever since). And this is another one of my guilty pleasures - a toasted sandwich consisting of TJ's Tuscan Pane bread (which makes wonderful toast), their to-die-for roasted red pepper spread with eggplant and garlic (my mom adds this to grilled cheese with her homemade hot peppers for the best grilled cheese sandwich ever), and warm goat cheese. I'm sure I could spice it up by adding some fresh basil leaves or some warm, roast chicken. But honestly, I love the simplicity of this sandwich. It makes me want to take a long, leisurely bike ride through the country, stopping for a picnic under some gigantic oak trees or tote a picnic basket to a beach to sit around a bonfire with a crisp glass of wine. If only every sandwich made you think of being on vacation!

trader joe's, roasted red pepper, goat cheese, sandwich, motown maiden


trader joe's, roasted red pepper, goat cheese, sandwich, motown maiden

Tuesday, July 7, 2009

Food: Roasted Broccoli and Shrimp

The following recipe by Melissa Clark actually ran in the New York Times in January but I only discovered it recently via The Wednesday Chef. In looking at photos of the dish, I thought it looked a little plain. As a result, I was concerned it would be lacking flavor and made a raisin vinagrette for the shrimp. But I should have trusted the rave reviews. It didn't need anything extra, except for a little bit of rice on the side.


Even though this meal is so simple and fast, both the process and the end results are extremely gratifying. For example, just grating citrus involves all of your senses...hearing the rasping noise the fruit makes and feeling the vibration in your fingertips when pushing the lemon across the grater while smelling the fresh, bright scent of lemon filling the air and watching little bits of bright yellow light up some olive oil. The other gratifying bit about making this dish is watching the shrimp turn from boring, transparent gray into hot and enticing coral. And you can't believe how plain and simple broccoli is transformed into something warm, juicy and intensely flavorful thanks to some exotic spices. This is definitely a dish you will make over and over again. May I mention again how quick and easy it is to pull together?

Roasted Broccoli with Shrimp
Adapted from The Wednesday Chef

Ingredients

  • 2 heads of broccoli, cut into bite-size florets
  • 4 tablespoons (1/4 cup) extra virgin olive oil
  • 1/2 teaspoon ground coriander
  • 1/2 teaspoon ground cumin
  • 1 teaspoons kosher salt
  • 1 teaspoon freshly ground black pepper
  • 1/8 teaspoon chili powder
  • 1-1.5 lbs large shrimp, shelled and deveined
  • Finely grated zest from 1 lemon

Directions

  • Preheat oven to 425 degrees. In a large bowl, toss broccoli with 2 tablespoons oil, coriander, cumin, 1/2 teaspoon salt, 1/2 teaspoon pepper and chili powder.
  • In a separate bowl, combine shrimp, 2 tablespoons oil, lemon zest, remaining 1/2 teaspoon salt and remaining 1/2 teaspoon pepper.
  • Spread broccoli in a single layer on a baking sheet. Roast for 10 minutes.
  • Add shrimp to baking sheet and toss with broccoli. Roast, tossing once halfway through, until shrimp are just opaque and broccoli is tender and golden around edges, about 10 minutes more.

Thursday, June 25, 2009

Food: Quick Grilled Chicken and Caesar Potato Salad

When I think of summer barbeques and picnics, two of the items that instantly come to mind are potato salad and grilled chicken. A couple of weekends ago I made this really quick meal for dinner, inspired by the Caesar Potato salad recipe featured in June's Bon Appetit. I don't know why it hadn't occurred to me to try a Caesar dressing on potatoes before, but this was great! Not only was it a non-mayo potato salad (which makes it more transportable for sticky, summer days), it's all fancied up for a celebration (or in this case a casual dinner) with colored baby potatoes, radishes, and crunchy sugar snap peas. It'd make a fantastic, showy, 4th of July side dish - especially if you mixed in some purple potatoes. I'm looking forward to making it again very soon.

Sorry...another blurry iPhone picture....

Smoky Grilled Chicken MM

Ingredients

  • 4 Boneless, Skinless Chicken Breasts
  • 1 Tb Smoked Paprika
  • 3 Tb Olive Oil
  • Salt & Pepper

Directions

  • Pre-heat your grill to medium heat
  • In a small bowl, mix together smoked paprika, olive oil, salt and pepper
  • After trimming any excess fat off the chicken, lay the breasts on a counter between two sheets of waxed paper and pound them flat to ensure they are all of uniform thickness.
  • Brush both sides of the chicken them with the oil/paprika mixture
  • Grill 8 to 12 minutes on Direct Medium, turning chicken mid-way through
Caesar Potato Salad with Sugar Snap Peas
From Bon Appetit (June 2009)

Ingredients
  • 1 1/2 pounds unpeeled assorted fingerling potatoes or baby potatoes (such as white-skinned, red-skinned, and purple), cut crosswise into 1/2-inch-thick slices
  • 8 oz trimmed sugar snap peas
  • 1 bunch radishes, trimmed, sliced
  • 1/2 small red onion, thinly sliced
  • 1/4 cup olive oil
  • 3 tablespoons fresh lemon juice
  • 1 tablespoon Dijon mustard
  • 1 garlic clove, pressed
  • 1/2 cup freshly grated Parmesan cheese

Directions

  • Steam potatoes on steamer rack set in large pot over boiling water until almost tender, about 10 minutes. Add sugar snap peas and steam until peas are crisp-tender and potatoes are just tender, about 1 minute longer. Transfer vegetables to large bowl. Cool slightly.
  • Add radishes and onion.
  • Whisk next 4 ingredients in small bowl to blend. Whisk in Parmesan. Season dressing with salt and generous amount of pepper. Add dressing to potato mixture; toss to coat. Season with more salt and pepper, if desired.
  • Serve warm or at room temperature.

Monday, June 15, 2009

Food: Shrimp Cakes with Spicy Sour Cream and Bok Choy

We're headed to the Carolinas on vacation in a few weeks and I've already started thinking about burying my toes in warm sand, finally being able to snuggle up with a book and read it cover-to-cover in one sitting, and spending time with family. I'm even looking forward to that salty crust the ocean water leaves on your skin and sunglasses and getting up entirely too early in the morning just to walk on the beach at sunrise. As a result of all of this, I've been craving food that reminds me of the sand and sunshine and relaxation.

For many of us, when we think of food from the East Coast, fresh crab and crab cakes come to mind. But, unless we live in that region, fresh, lump crabmeat isn't exactly easy to find at your local market/grocery store. As a result, when I saw a recipe for seafood cakes using shrimp, I was instantly intrigued. Maybe it's a fairly common thing for all of you in coastal towns, but being a mid-westerner, I can't say I've ever seen let alone tasted a shrimp cake before. I suppose I shouldn't feel too guilty about it though since even Bubba from the film "Forest Gump" left out shrimp cakes in his famous shrimp-this, shrimp-that spiel. Anyway, with that said, I decided to try out this recipe. The end result was a warm, fresh-tasting, lightly seasoned, crispy on the outside cake with a spicy, kick-in-the-mouth of a dip on the side. Saute up a little bit of baby bok choy with some freshly grated ginger and you'll have a perfect little meal. The cakes make great left-overs and can be either eaten alone or on a sandwich - but make sure you consume them within a day or two.


Shrimp Cakes
Adapted from a recipe by Sansei Seafood Restaurant & Sushi Bar (Maui) featured in Bon Appétit, September 2005

Ingredients

  • 2 bags, frozen uncooked, peeled, deveined large shrimp (~2lbs), thawed, rinsed, and patted dry
  • 2 large eggs
  • 1 shallot, diced
  • Juice from 1 lemon
  • 2 tablespoons stone ground mustard
  • 3-4 tablespoons fresh cilantro, finely chopped
  • 3 cups panko (Japanese breadcrumbs)
  • 2 tablespoons (or more) vegetable oil
  • 1 1/2 t hot sauce
  • 1 clove garlic, minced

Directions

  • Coarsely chop shrimp in processor.
  • Add eggs, shallot, lemon juice, mustard, cilantro, hot pepper sauce. Blend in using on/off turns.
  • Add 2 cups panko and blend in using on/off turns.
  • Form mixture into 3-to-4-inch-diameter cakes. Roll cakes in remaining 1 cup panko; transfer to waxed-paper-lined baking sheet. Refrigerate 20 minutes. (Can be made up to 4 hours ahead).
  • Heat 2 tablespoons oil in heavy large skillet over medium-high heat. Working in batches, fry cakes until cooked through and golden brown on both sides, adding more oil to skillet as needed, about 6 minutes.
  • Spoon Spicy Sour Cream on to each cake or serve alongside for dipping.

Spicy Sour Cream
MM Original


Ingredients
  • 8 oz container Light Sour Cream
  • 4 Tb Chili Garlic Sauce (found in the Asian Foods Section)
  • Zest from 1 Lime
  • 1 t freshly grated ginger
Directions

  • Combine all four ingredients together in bowl. Stir to combine.

Wednesday, June 3, 2009

Food: Mahi Mahi with Fava Beans and Warm Apricots

This weekend I decided to find out what the fava bean hype is all about since nearly every food magazine I have read recently has featured them in a recipe. I happened to see favas in a big barrel at my local Meijer a couple of weeks ago and when they were still in stock last Friday, I bought a couple of pounds to try them out. Although many recipes kept saying all of the work was worth it (shell the beans, then dunk the beans into boiling water for 30-60 seconds, cool the beans, peel the beans), I've decided the flavor and texture isn't really anything special (I'm sure some of you are screaming at me right now). And quite honestly the fava didn't provide an overwhelming taste/texture experience. I will admit they have a cool name and interesting pods (the pods look and feel like sponge when you pop them open), but other than that they're pretty boring. I think next time I could quite easily substitute shelled edamame (Die-hard fava fans can agree to disagree with me).


fava beans, hype
fava beans, hype
fava bean, hype
fava beans, hype, mahi mahi, apricots
Mahi-Mahi
Adapted from a recipe by Molly Stevens
This is a great technique for fish - it produces a light but crispy crust that seals in all the moisture.
Ingredients
  • 1 Tb finely chopped Parsley (can substitute basil, lemon balm, or mint)
  • Finely grated zest from 1 Lemon (can substitute orange zest if you want a sweeter finish)
  • Salt & Pepper
  • 1/2 t Red Pepper Flakes (if desired)
  • 3-4 Tb Flour
  • 1 Tb Olive Oil
  • 2 fillets of Mahi-Mahi

Directions

  • Combine parsley, zest, salt and pepper. Rub both sides of the fish with the parsley-zest mixture (can be done in advance to allow the flavors to soak in). Just prior to cooking, dredge the fish in flour.
  • In a skillet, add ~1 Tb of olive oil (just enough to cover bottom of pan) and heat to medium-high.
  • Cook fish for 4-5 minutes per side until nicely browned and cooked through.

Sides

Fava Beans: After beans have been properly prepared (shelled, dunked in hot water, peeled), sautee in a skillet with a touch of olive oil until tender and then sprinkle with a little salt and fresh ground pepper.

Apricots: Wash and halve 4-5 apricots, removing pits. Place cut side down on hot grill pan until sear marks appear and apricots are heated through (3-4 minutes).

Tuesday, June 2, 2009

Food: Bacon and Swiss Chard Pasta

Last spring, Bon Appetit published a recipe for bacon and swiss chard pasta. When I first saw it, I was immediately reminded of a pizza my mother used to make in the summer. When my parents' beautiful garden was full of big onions and leafy chard we were all in for a special treat. It was at this time my mom would mix up a batch of homemade pizza dough. After it had risen, she would roll it out, place on a cornmeal dusted pizza pan and then coat with a combination of wilted chard, translucent onions, crunchy bacon and a nice dusting of grated parmesan. This pasta combines all of the flavors that I loved in that pizza. And the nice thing about this recipe is you don't have to wait the 30-45 minutes for dough to rise - you get rather quick gratification. This is a perfect, easy going summer meal. I could even see it being modified to add some fresh, meaty tomatoes when available to provide a little added tang to the dish.


Recipe by Bon Appetit Test Kitchen - May 2008

Ingredients
  • 1 pound linguine
  • 12 oz bacon, cut crosswise into 1/2-inch slices
  • 1 very large red onion, halved, sliced (about 6 cups)
  • 2 large bunches Swiss chard, stemmed, chopped (about 12 cups)
  • 1 tablespoon balsamic vinegar
  • 3 tablespoons extra-virgin olive oil
  • 2/3 cup grated Parmesan cheese

Preparation
  • Cook linguine in large pot of boiling salted water until tender but still firm to bite, stirring occasionally. Drain, reserving 1 cup pasta cooking liquid.
  • Meanwhile, cook bacon in heavy large pot over medium heat until beginning to crisp, about 10 minutes. Transfer to paper towels to drain.
  • Drain all but 2 tablespoons bacon drippings from skillet. Add onion and sauté over medium-high heat until softened, about 7 minutes. Add Swiss chard and sprinkle with salt and pepper. Add pasta cooking liquid to skillet. Toss until chard is wilted and tender, about 4 minutes. Sprinkle vinegar over; cook 1 minute.
  • Add linguine and oil to sauce in pot and toss to coat. Transfer to large bowl. Sprinkle with bacon and cheese. Season to taste with salt and pepper.

Sunday, May 31, 2009

Food: Easy Egg Sandwiches

This past weekend I was looking to make a quick lunch (when you work inside a boring office all week, time outside on the weekends is certainly precious). We had some left over cheese bagels in our freezer, so I decided to throw together some easy egg sandwiches. Once I fried up the eggs, I layered them on toasted bagels with fresh, steaky tomatoes, thinly sliced sopressata and a touch of mustard. This was so much better than any breakfast sandwich at the coffee shop chains - and it maybe took 10 minutes to prepare. I think I should start making egg sandwiches more often!


egg bagel, sopressata, Panera, Cheese, Egg, Mustard

Friday, May 29, 2009

Food: Warm Salmon, Chickpea and Tomato Bowl

I'm not quite sure what it is about Mediterranean-style food that leaves you feeling healthy and satisfied all at the same time. Meals like the one below are comforting yet don't make you feel guilty or like you've eaten too much. The original recipe is by Jill Dupleix and was featured in Bon Appetit in May 2007 (I've modified it slightly). Serve with crusty bread and a crisp white wine for a complete, relaxed meal.

Salmon Salad, Chickpeas, Bon Appetit, Tomatoes, Green Beans, Summer, Mediterranean

Warm Salmon, Chickpea & Tomato Bowl

INGREDIENTS
6 tablespoons olive oil, divided
2 center-cut salmon fillets
2 cups chickpeas from two (15-ounce) cans, drained, rinsed
2 large tomatoes, chopped (preferably meaty, beefsteak variety)
1/4 cup pitted, Kalamata Olives
2 tablespoons chopped fresh Italian parsley
Juice from one orange

Juice from one lemon
1 tablespoon salt-packed capers, rinsed, or drained capers in brine
1 tablespoon grated orange peel
1 teaspoon grated lemon peel
2 handfuls fresh green beans

PREPARATION

  • Heat 1 tablespoon oil in each of 2 heavy large skillets. Sprinkle salmon with salt and pepper. Add fillets to each skillet and cook until almost cooked through, about 3 minutes per side. Cool slightly.
  • In a small skillet, add 4 tablespoons of water and place over medium-heat. Add green beans and simmer until cooked through yet still crisp, approximately 5 minutes.
  • Heat remaining 4 tablespoons oil in large skillet over medium-high heat. Add chickpeas and all remaining ingredients (including cooked green beans) except parsley. Stir until warm. Season with salt and pepper.
  • Divide chickpea mixture among 6 plates. Tear salmon into 1- to 1 1/2-inch
    pieces; scatter over chickpea/tomato mixture. Garnish with parsley and serve.

Tuesday, May 26, 2009

Food: Italian Sausage and Oven Baked Onion Rings

A couple of weekends ago my family came into town to visit. Since they were arriving on Friday evening and I was going to be at work until almost dinnertime, I decided to make a relatively low-maintenance meal. First, my sister Meghan helped me sear some spicy Italian sausage on the stove top which we then added to a crock pot with sliced green peppers and marinara sauce. We put the pot on high and let it cook until my parents arrived. Next, we decided to try making Ellie Krieger's oven-baked onion rings. Although the flavor turned out great, we did have a few issues in coating the onions - the buttermilk caused massive chip clumping early on in the process. As a result, next time I make these I'd plan to follow two tips posted by reviewers of the recipe: Grind the chip mixture to the point it resembles cornmeal; Put the onions in the fridge for 15-20 minutes after coating them with buttermilk. Also, be sure to follow the last step in Krieger's directions - coating the rings with cooking spray keeps them from burning.

oven baked onion rings, ellie krieger, italian sausage, quick meals, motown maiden

Ellie Krieger's Oven Baked Onion Rings

Ingredients
Cooking spray
4 cups baked potato chips (Baked chips made from whole potatoes work best)
1/2 teaspoon cayenne (I left this out since we were having spicy sausage - they still tasted great)
1 cup lowfat buttermilk
1/2 cup plus 2 tablespoons all-purpose flour
1/2 teaspoon salt
1/4 teaspoon fresh ground black pepper
1 to 2 large Vidalia onions, peeled

Directions

  • Preheat the oven to 450 degrees F.
  • Spray a baking sheet slightly with oil and set aside.
  • Place potato chips in the bowl of a food processor and process into crumbs, about 20 seconds. Transfer to a shallow bowl, add cayenne, and set aside.
  • In another bowl, combine buttermilk, 2 tablespoons of flour, salt and pepper and set aside.
  • Slice onions into 1/2-inch circles and separate into rings, keeping only large, whole rings (reserve rest of onions for other uses). You should come out with about 12 to 14 rings.
  • Place the remaining flour in a sealable plastic bag, then add onions, and shake to coat.
  • Dip onions 1 at a time into the buttermilk mixture, then dip into potato chip crumbs and place on baking sheet.
  • Spray canola oil evenly over rings and bake for 20 minutes, or until coating is crisp.
  • Season with salt, to taste, and serve immediately. (I didn't think they needed any salt due to the potato chips containing plenty already).
Related Posts with Thumbnails